

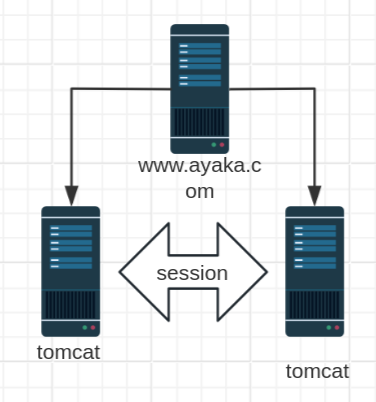
Tomcat Session Replication Cluster
Tomcat 官方实现了 Session 的复制集群,将每个Tomcat的Session进行相互的复制同步,从而保证所有Tomcat都有相同的Session信息
配置说明
官方文档:
https://tomcat.apache.org/tomcat-10.0-doc/cluster-howto.html
https://tomcat.apache.org/tomcat-9.0-doc/cluster-howto.html
https://tomcat.apache.org/tomcat-8.5-doc/cluster-howto.html
http://tomcat.apache.org/tomcat-7.0-doc/cluster-howto.html
修改 conf/server.conf
<Cluster className="org.apache.catalina.ha.tcp.SimpleTcpCluster"
         channelSendOptions="8">
    <Manager className="org.apache.catalina.ha.session.DeltaManager"
            expireSessionsOnShutdown="false"
            notifyListenersOnReplication="true"/>
    <Channel className="org.apache.catalina.tribes.group.GroupChannel">
        <Membership className="org.apache.catalina.tribes.membership.McastService"
                    address="228.0.0.4" #指定的多播地址
                    port="45564" #45564/UDP
                    frequency="500" #间隔500ms发送
                    dropTime="3000"/> #故障阈值3s
        <Receiver className="org.apache.catalina.tribes.transport.nio.NioReceiver"
                  address="auto" #监听地址,此项建议修改为当前主机的IP(不支持0.0.0.0),如果不修改可能会导致服务无法启动
                  port="4000" #监听端口
                  autoBind="100" #如果端口冲突,自动绑定其它端口,范围是4000-4100
                  selectorTimeout="5000" #自动绑定超时时长5s
                  maxThreads="6"/>
        <Sender className="org.apache.catalina.tribes.transport.ReplicationTransmitter">
	<Transport className="org.apache.catalina.tribes.transport.nio.PooledParallelSender"/>
            </Sender>
<Interceptor className="org.apache.catalina.tribes.group.interceptors.TcpFailureDetector"/>
 <Interceptor className="org.apache.catalina.tribes.group.interceptors.MessageDispatchInterceptor"/>
        </Channel>
    <Valve className="org.apache.catalina.ha.tcp.ReplicationValve" filter=""/>
    <Valve className="org.apache.catalina.ha.session.JvmRouteBinderValve"/>
    <Deployer className="org.apache.catalina.ha.deploy.FarmWarDeployer"
              tempDir="/tmp/war-temp/"
              deployDir="/tmp/war-deploy/"
              watchDir="/tmp/war-listen/"
              watchEnabled="false"/>

    <ClusterListener className="org.apache.catalina.ha.session.ClusterSessionListener"/>
</Cluster>
#注意:tomcat7的官方文档此处有错误
http://tomcat.apache.org/tomcat-7.0-doc/cluster-howto.html
......
<ClusterListener className="org.apache.catalina.ha.session.JvmRouteSessionIDBinderListener">
    <ClusterListener className="org.apache.catalina.ha.session.ClusterSessionListener">
        </Cluster>
配置说明
- Cluster 集群配置
- Manager 会话管理器配置
- Channel 信道配置
- Membership 成员判定。使用什么多播地址、端口多少、间隔时长ms、超时时长ms。同一个多播地址和端口认为同属一个组。使用时修改这个多播地址,以防冲突
- Receiver 接收器,多线程接收多个其他节点的心跳、会话信息。默认会从4000到4100依次尝试可用端口
- address="auto",auto可能绑定到127.0.0.1上,所以一定要改为当前主机可用的IP
- Sender 多线程发送器,内部使用了tcp连接池。
- Interceptor 拦截器
- Valve
- ReplicationValve 检测哪些请求需要检测Session,Session数据是否有了变化,需要启动复制过程
- ClusterListener
- ClusterSessionListener 集群session侦听器
使用 <Cluster className="org.apache.catalina.ha.tcp.SimpleTcpCluster"/>
添加到 <Engine> 所有虚拟主机都可以启用Session复制
添加到 <Host> ,该虚拟主机可以启用Session复制
最后,在应用程序内部启用了才可以使用
修改应用目录下的 WEB-INF/web.xml
注意: 不要修改 conf/web.xml,此文件不起作用
注意:WEB-INF/web.xml文件的如果权限不对,会导致复制失败
	</description>
<distributable/> #添加此行
</web-app>
实战案例: 实现 Tomcat Session 集群2
环境准备:
- 时间同步,确保NTP或Chrony服务正常运行
- 防火墙规则
| IP | 主机名 | 服务 | 组件/软件 |
|---|---|---|---|
| 10.0.0.100 | proxy.ayaka.org | 调度器 | Nginx、HTTPD |
| 10.0.0.101 | t1.ayaka.org | tomcat1 | JDK8、Tomcat8 |
| 10.0.0.102 | t2.ayaka.org | tomcat2 | JDK8、Tomcat8 |
在 proxy 主机设置 httpd (或nginx)实现后端tomcat主机轮询
[root@proxy ~]#cat /etc/httpd/conf.d/tomcat.conf
<Proxy balancer://tomcat-server>
	BalancerMember http://t1.wang.org:8080 loadfactor=1
	BalancerMember http://t2.wang.org:8080 loadfactor=1
</Proxy>

<VirtualHost *:80>
    ServerName proxy.wang.org
    ProxyRequests Off
    ProxyVia On
    ProxyPreserveHost On
    ProxyPass / balancer://tomcat-server/
    ProxyPassReverse / balancer://tomcat-server/
    </VirtualHost>

[root@proxy ~]#systemctl restart httpd
在所有后端tomcat主机上修改conf/server.xml
本次把多播复制的配置放到t1.wang.org和t2.wang.org虚拟主机里面, 即Host块中。
特别注意修改Receiver的address属性为一个本机可对外的IP地址。
修改 t1 主机的 conf/server.xml
#将前面内容复制到conf/server.xml的Host块内或Engine块(针对所有主机)
[root@t1 ~]#vim /usr/local/tomcat/conf/server.xml
[root@t1 ~]#cat /usr/local/tomcat/conf/server.xml
.....以上省略.....
	<Host name="t1.wang.org" appBase="/data/webapps" unpackWARs="true" autoDeploy="true">
  ###################在<Host> </host>块中间加下面一段内容##############################
    <Cluster className="org.apache.catalina.ha.tcp.SimpleTcpCluster" channelSendOptions="8">

        <Manager className="org.apache.catalina.ha.session.DeltaManager"
                 expireSessionsOnShutdown="false"
                 notifyListenersOnReplication="true"/>

        <Channel className="org.apache.catalina.tribes.group.GroupChannel">
            <Membership className="org.apache.catalina.tribes.membership.McastService"
                        address="230.100.100.100" #指定不冲突的多播地址
                        port="45564"
                        frequency="500"
                        dropTime="3000"/>

            <Receiver className="org.apache.catalina.tribes.transport.nio.NioReceiver"
                      address="10.0.0.101" #监听地址,此项建议修改为当前主机的IP,如果不修改可能会导致服务无法启动
                      port="4000"
                      autoBind="100"
                      selectorTimeout="5000"
                      maxThreads="6"/>

            <Sender className="org.apache.catalina.tribes.transport.ReplicationTransmitter">
                <Transport className="org.apache.catalina.tribes.transport.nio.PooledParallelSender"/>
            </Sender>

            <Interceptor className="org.apache.catalina.tribes.group.interceptors.TcpFailureDetector"/>
            <Interceptor className="org.apache.catalina.tribes.group.interceptors.MessageDispatchInterceptor"/>
        </Channel>

        <Valve className="org.apache.catalina.ha.tcp.ReplicationValve" filter=""/>
        <Valve className="org.apache.catalina.ha.session.JvmRouteBinderValve"/>

        <Deployer className="org.apache.catalina.ha.deploy.FarmWarDeployer"
                  tempDir="/tmp/war-temp/"
                  deployDir="/tmp/war-deploy/"
                  watchDir="/tmp/war-listen/"
                  watchEnabled="false"/>

        <ClusterListener className="org.apache.catalina.ha.session.ClusterSessionListener"/>
    </Cluster>
        #######################################以上内容是新加的##########################
    </Host>
  </Engine>
 </Service>
</Server>

[root@t1 ~]#systemctl restart tomcat
[root@t1 ~]#ss -ntl
State Recv-Q Send-Q Local Address:Port Peer
Address:Port
LISTEN 0 128 0.0.0.0:22
0.0.0.0:*
LISTEN 0 100 127.0.0.1:25
0.0.0.0:*
LISTEN 0 128 [::]:22 [::]:*
LISTEN 0 100 [::1]:25 [::]:*
LISTEN 0 50 [::ffff:10.0.0.101]:4000 *:*
LISTEN 0 1 ::ffff:127.0.0.1]:8005 *:*
LISTEN 0 100 *:8009 *:*
LISTEN 0 100 *:8080 *:*
简化说明
t1的conf/server.xml中,如下
<Host name="t1.wang.org" appBase="/data/webapps" autoDeploy="true" >
#其他略去
    <Receiver className="org.apache.catalina.tribes.transport.nio.NioReceiver"
              address="10.0.0.101" #只改此行
              port="4000"
              autoBind="100"
              selectorTimeout="5000"
              maxThreads="6"/>
修改 t2 主机的 conf/server.xml
[root@t2 ~]#vim /usr/local/tomcat/conf/server.xml
[root@t2 ~]#cat /usr/local/tomcat/conf/server.xml
.....以上省略.....
	<Host name="t2.wang.org" appBase="/data/webapps" unpackWARs="true" autoDeploy="true">
  ###################在<Host> </host>块中间加下面一段内容##############################
    <Cluster className="org.apache.catalina.ha.tcp.SimpleTcpCluster" channelSendOptions="8">

        <Manager className="org.apache.catalina.ha.session.DeltaManager"
                 expireSessionsOnShutdown="false"
                 notifyListenersOnReplication="true"/>

        <Channel className="org.apache.catalina.tribes.group.GroupChannel">
            <Membership className="org.apache.catalina.tribes.membership.McastService"
                        address="230.100.100.100" #指定不冲突的多播地址
                        port="45564"
                        frequency="500"
                        dropTime="3000"/>

            <Receiver className="org.apache.catalina.tribes.transport.nio.NioReceiver"
                      address="10.0.0.102" #监听地址,此项建议修改为当前主机的IP,如果不修改可能会导致服务无法启动
                      port="4000"
                      autoBind="100"
                      selectorTimeout="5000"
                      maxThreads="6"/>

            <Sender className="org.apache.catalina.tribes.transport.ReplicationTransmitter">
                <Transport className="org.apache.catalina.tribes.transport.nio.PooledParallelSender"/>
            </Sender>

            <Interceptor className="org.apache.catalina.tribes.group.interceptors.TcpFailureDetector"/>
            <Interceptor className="org.apache.catalina.tribes.group.interceptors.MessageDispatchInterceptor"/>
        </Channel>

        <Valve className="org.apache.catalina.ha.tcp.ReplicationValve" filter=""/>
        <Valve className="org.apache.catalina.ha.session.JvmRouteBinderValve"/>

        <Deployer className="org.apache.catalina.ha.deploy.FarmWarDeployer"
                  tempDir="/tmp/war-temp/"
                  deployDir="/tmp/war-deploy/"
                  watchDir="/tmp/war-listen/"
                  watchEnabled="false"/>

        <ClusterListener className="org.apache.catalina.ha.session.ClusterSessionListener"/>
    </Cluster>
        #######################################以上内容是新加的##########################
    </Host>
  </Engine>
 </Service>
</Server>

[root@t1 ~]#systemctl restart tomcat
[root@t1 ~]#ss -ntl
State Recv-Q Send-Q Local Address:Port Peer
Address:Port
LISTEN 0 128 0.0.0.0:22
0.0.0.0:*
LISTEN 0 100 127.0.0.1:25
0.0.0.0:*
LISTEN 0 128 [::]:22 [::]:*
LISTEN 0 100 [::1]:25 [::]:*
LISTEN 0 50 [::ffff:10.0.0.101]:4000 *:*
LISTEN 0 1 ::ffff:127.0.0.1]:8005 *:*
LISTEN 0 100 *:8009 *:*
LISTEN 0 100 *:8080 *:*
简化说明
t2主机的server.xml中,如下
<Host name="t1.wang.org" appBase="/data/webapps" autoDeploy="true" >
#其他略去
    <Receiver className="org.apache.catalina.tribes.transport.nio.NioReceiver"
              address="10.0.0.102" #只改此行
              port="4000"
              autoBind="100"
              selectorTimeout="5000"
              maxThreads="6"/>
尝试使用刚才配置过得负载均衡(移除Session黏性),测试发现Session还是变来变去。
修改应用目录下的 WEB-INF/web.xml文件开启该应用程序的分布式
参考官方说明: https://tomcat.apache.org/tomcat-8.5-doc/cluster-howto.html
Make sure your web.xml has the <distributable/> element
为所有tomcat主机应用web.xml的 <web-app> 标签增加子标签 <distributable/> 来开启该应用程序的分布式。
修改t1主机的应用目录下的 WEB-INF/web.xml文件
[root@t1 ~]#ll /usr/local/tomcat/webapps/ROOT/WEB-INF/
total 4
-rw-r----- 1 tomcat tomcat 1227 Jul 1 05:53 web.xml

#保留权限
[root@t1 ~]#cp -a /usr/local/tomcat/webapps/ROOT/WEB-INF/ /data/webapps/ROOT/
/data/webapps/ROOT/
├── index.jsp
└── WEB-INF
	└── web.xml
#在倒数第二行加一行
[root@t1 ~]##vim /data/webapps/ROOT/WEB-INF/web.xml
[root@t1 ~]#tail -n3 /data/webapps/ROOT/WEB-INF/web.xml
	</description>
<distributable/> #添加此行
</web-app>

#注意权限
[root@t1 ~]#ll /data/webapps/ROOT/WEB-INF/
total 4
-rw-r----- 1 tomcat tomcat 1243 Jan 17 09:37 web.xml
#生效
[root@t1 ~]#systemctl restart tomcat

#同时观察日志
[root@t1 ~]#tail -f /usr/local/tomcat/logs/catalina.out
15-Jul-2020 11:29:10.998 INFO [Membership-MemberAdded.]
org.apache.catalina.ha.tcp.SimpleTcpCluster.memberAdded Replication member added:
[org.apache.catalina.tribes.membership.MemberImpl[tcp://{10, 0, 0, 102}:4000,
{10, 0, 0, 102},4000, alive=1022, securePort=-1, UDP Port=-1, id={89 -26 -30 -99
16 80 65 95 -65 14 -33 124 -55 -123 -30 82 }, payload={}, command={}, domain=
{}]]
修改t2主机的应用目录下的 WEB-INF/web.xml 文件
#与t1相同的操作
[root@t2 ~]#cp -a /usr/local/tomcat/webapps/ROOT/WEB-INF/ /data/webapps/ROOT/
[root@t2 ~]#vim /data/webapps/ROOT/WEB-INF/web.xml
[root@t2 ~]#tail -n3 /data/webapps/ROOT/WEB-INF/web.xml
	</description>
<distributable/> #倒数第二行添加此行
</web-app>

#注意权限
[root@t2 ~]#ll /data/webapps/ROOT/WEB-INF/
total 4
-rw-r----- 1 tomcat tomcat 1243 Jan 17 09:38 web.xml

#生效
[root@t2 ~]#systemctl restart tomcat

#同时观察日志
[root@t2 ~]#tail -f /usr/local/tomcat/logs/catalina.out
15-Jul-2020 11:29:12.088 INFO [t2.wang.org-startStop-1]
org.apache.catalina.ha.session.DeltaManager.getAllClusterSessions Manager [],
requesting session state from
[org.apache.catalina.tribes.membership.MemberImpl[tcp://{10, 0, 0, 101}:4000,
{10, 0, 0, 101},4000, alive=208408, securePort=-1, UDP Port=-1, id={118 -108
-116 119 58 22 73 113 -123 -96 -94 111 -65 -90 -87 -107 }, payload={}, command=
{}, domain={}]]. This operation will timeout if no session state has been
received within [60] seconds.
测试访问
重启全部Tomcat,通过负载均衡调度到不同节点,返回的SessionID不变了。
用浏览器访问,并刷新多次,发现SessionID 不变,但后端主机在轮询
#修改t1和t2的配置项,删除jvmRoute配置项
[root@t1 tomcat]#vim conf/server.xml
<Engine name="Catalina" defaultHost="t1.wang.org" >
[root@t1 tomcat]#systemctl restart tomcat

#多次执行下面操作,可以看到SessionID不变
[root@centos7 ~]#curl -b 'JSESSIONID=1A3E7EED14F3E44FAF7469F8693E1CB6' proxy.wang.org/index.jsp
<!DOCTYPE html>
<html lang="en">
<head>
<meta charset="UTF-8">
<title>tomcat test</title>
</head>
<body>
<h1> tomcat website </h1>
<div>On tomcat-server</div>
<div>10.0.0.102:8080</div>
<div>SessionID = <span
style="color:blue">1A3E7EED14F3E44FAF7469F8693E1CB6</span></div>
Wed Jul 15 11:33:09 CST 2020
</body>
</html>
[root@centos7 ~]#curl -b 'JSESSIONID=1A3E7EED14F3E44FAF7469F8693E1CB6' proxy.wang.org/index.jsp
<!DOCTYPE html>
<html lang="en">
<head>
<meta charset="UTF-8">
<title>tomcat test</title>
</head>
<body>
<h1> tomcat website </h1>
<div>On tomcat-server</div>
<div>10.0.0.101:8080</div>
<div>SessionID = <span
style="color:blue">1A3E7EED14F3E44FAF7469F8693E1CB6</span></div>
Wed Jul 15 11:33:10 CST 2020
</body>
</html>
[root@centos7 ~]#
故障模拟
#模拟t2节点故障
[root@t2 ~]#systemctl stop tomcat
#多次访问SessionID不变
[root@centos7 ~]#curl -b 'JSESSIONID=1A3E7EED14F3E44FAF7469F8693E1CB6' proxy.wang.org/index.jsp
<!DOCTYPE html>
<html lang="en">
<head>
<meta charset="UTF-8">
<title>tomcat test</title>
</head>
<body>
<h1> tomcat website </h1>
<div>On tomcat-server</div>
<div>10.0.0.101:8080</div>
<div>SessionID = <span
style="color:blue">1A3E7EED14F3E44FAF7469F8693E1CB6</span></div>
Wed Jul 15 12:01:16 CST 2020
</body>
</html>
恢复实验环境
为学习后面的内容,删除此节相关配置,为后续内容准备
#恢复t1环境
[root@t1 ~]#vim /usr/local/tomcat/conf/server.xml
[root@t1 ~]#tail /usr/local/tomcat/conf/server.xml
<Valve className="org.apache.catalina.valves.AccessLogValve"
directory="logs"
prefix="localhost_access_log"
suffix=".txt"
pattern="%h %l %u %t "%r" %s %b" />
</Host>
<Host name="t1.wang.org" appBase="/data/webapps" unpackWARs="true" autoDeploy="true">
</Host>
</Engine>
</Service>
</Server>
[root@t1 ~]#rm -f /data/webapps/ROOT/WEB-INF/web.xml
[root@t1 ~]#systemctl restart tomcat
#恢复t2环境
[root@t2 ~]#vim /usr/local/tomcat/conf/server.xml
[root@t2 ~]#tail /usr/local/tomcat/conf/server.xml
<Valve className="org.apache.catalina.valves.AccessLogValve"
directory="logs"
prefix="localhost_access_log"
suffix=".txt"
pattern="%h %l %u %t "%r" %s %b" />
</Host>
<Host name="t2.wang.org" appBase="/data/webapps" unpackWARs="true" autoDeploy="true">
</Host>
</Engine>
</Service>
</Server>
[root@t2 ~]#rm -f /data/webapps/ROOT/WEB-INF/web.xml
[root@t2 ~]#systemctl restart tomcat